Monday, July 29, 2013

Charcoal Clay Mask and Simple Granola

My first DIY mask got some attention on Pinterest, but I am here to tell you that the one I am posting today is far better.  I am stuck on charcoal for my face because of how well it pulls out toxins.  I didn't like the liquid texture of my last mask though, so I decided to mix it in with a clay mask.  This improved the texture and quadrupled the effectiveness of the mask.  My love for charcoal masks started with the Origins charcoal mask, but I'm a cheapskate and wanted to find a cheaper option.  Combining the clay mask with the activated charcoal gave me the same texture of the Origins mask and actually gave me better results.

The Clay I used is Now European Clay Powder and you can get it in health foods stores and online using Google.  However, there are many different prices posted online, I paid about $5 for mine at my local health food store and found it for even less (swansonvitamins.com has it for $4.35).  If you have sensitive skin, go with Now Moroccan Red Clay Powder. I use Thayer's Lemon Witch Hazel with Aloe Vera as a toner/moisturizer.  I bought it at my local health food store as well and I like it better than using the harsh chemicals that come in other toners.

Charcoal European Clay Mask

 You are going to need:
  • 1/4 tsp. Activated Charcoal
  • 1 tb. Now European Clay Powder
  • 2 tsp. Water
  • Thayer's Lemon Witch Hazel (or another variation, it also comes in Lavendar and Rose)
Combine charcoal and clay powder in a small plastic bowl and stir.  After the powder is blended, add water one 1/2 teaspoon at a time until you get a nice clay/muddy consistency.  Spread it on your face and along the lower jaw line evenly and allow it to set for about 15 to 20 minutes.  It tingles and tightens as it dries, so don't be alarmed.  However, if you feel the need to avoid some slight inflammation after removing the mask, do not allow it to completely dry.  Remove with a warm washcloth.  Follow with lemon witch hazel (soak a cotton ball with it to apply) to moisturize.  I have oily acne prone skin and have been using the Oil Cleansing Method (blog post to follow) so I don't use regular moisturizers, at most I would use a drop of olive oil if my skin feels dry, but the lemon witch hazel does it for me.
As you can see, my skin was a bit inflamed after removing the mask because I allowed it to dry.   However, the redness subsided after about 20 minutes.  

I loved the consistency of the mask as well as the way it made my skin feel after.  My pores look and feel cleaner and my skin is nice and soft.  I won't be going back to my Origins mask.  Not to say that the Origins mask is bad, I love it, but it costs $23 at Sephora for a tiny 3.4 oz tube.  I can think of better ways to spend $23 (food for example).  Not to mention, the results were better with this "homemade" mask.

All in all, I highly recommend this mask to anyone with normal, oily, acne-prone skin, and/or large pores.  This is great at cleaning out the pores and drawing out the toxins and dirt and crap that create pimples and junk.  I have a way with words, don't I?


Simple Granola

My search for a granola recipe is finally complete.  I have been struggling to find a granola recipe that doesn't have over ten ingredients and therefore, cost a lot of money.  I like this recipe because it keeps things simple and still delicious.  Not to mention, you can customize it to suit your needs.

A BFF of mine sent me the recipe completely on the random and I have loved since.

Basic Homemade Granola
  • 1 cup coconut oil (the recipe points out that you can substitute canola oil or mix half coconut oil and half butter)
  • 1 cup honey
  • 1/2 cup brown sugar (add more for sweeter granola, I know I will next time)
  • 4 tsp. vanilla
  • 2 tsp. cinnamon
  • 15 cups (42 oz) old fashioned oats
  • Other optional additions: crushed nuts, dried fruit, chocolate chips, etc.
Preheat oven to 375 degrees.  

Mix brown sugar, oil, and honey in a small sauce pan and bring to a low boil.  Remove from heat and stir in cinnamon and vanilla.  

Pour over oats in a large mixing bowl and stir until well coated.  (I added crushed pecans to the oats before this step.)

Spread oats out in two or three 9x13 pans (I used one 9x13 and two 9x9 pans because that's what I have and it worked out fine).

Bake at 375 degrees for ten minutes.  Take out and stir.  Return to oven and turn off the heat.  The granola will be done when the oven cools.

Transfer granola to an air-tight container or bag to store.  I added Craisins to the mix after it cooked and it was delicious.

I love the recipe, but I will be making it with butter and more sugar next time.  My husband likes things sweet, and this recipe is just a little bit on the blander side for his taste.  


Wednesday, July 24, 2013

Jewelry Inspiration and Goldfingers

Wow, it's been so long since the last time I wrote!  Believe me, there has been no shortage of curiosity and crazy Pinterest ideas, I just haven't really had a whole lot of time to write.  Sad, I know.  I'm sure there are many heartbroken people out there...  Okay, not really, but whatevs.  Anyways... 

Jewelry Display

Sad jewelry box.
My latest experiment has been a very time consuming one.  You see, I have a little bit of jewelry... This jewelry was sitting in a very old makeup box-converted jewelry box.  I have always hated the thing, but what the heck, I just hid it in my closet.  This wasn't ideal because the jewelry was all stuck in little drawers and expected to behave.  However, when jewelry is left to it's own devices in close quarters, it fights.  My necklaces became entangled into one big mega-necklace and my earrings would just give up on life and disconnect from their hooks in hopes of cheating on their mates with other earrings.  Dramatic?  Maybe.  The point is that it was not the ideal situation and my jewelry was getting battered.  

I once helped a cousin organize her jewelry in a way that displayed it rather than hiding it.  I was honestly a little bit jealous, but my small apartment doesn't allow for the same kind of space she has for her jewelry.  So I started googling jewelry displays and found one that I really liked that involved a picture frame, a shelf, and some knobs.  This was my inspiration.  I even pinned it for posterity.

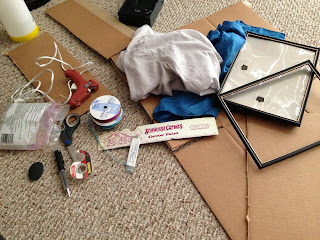
So I knew this project had to be free to dirt cheap, so I gathered all the things I thought I would need in my living room and created a pseudo-workstation.

I grabbed some certificate displays, left over from my wedding (an oops purchase), my handy dandy hot glue gun and glue, ribbon, scissors, fabric, cardboard, pencil, eraser, box cutter, ruler, the old makeup box, thumbtacks, a picture hanging kit full of hooks and wire, spray paint, and a sharpie paint pen.  This didn't all make it in the picture as I made it up as I went.

The first thing I did was measure and cut out enough cardboard for my frames, then I wrapped the cardboard in fabric and glued it into the frames, adding the back of the frame for easy hang-up.  I did two of the striped material (an old shirt) and one of the blue because I liked having the blue piece as an accent.  The blue was an old scarf that I never used for some reason or another.  These would be my earring holders.

Next, I created the "shelves" for my bracelets, rings, and necklaces.  I used drawers from the old jewelry box to fulfill this need.  First, I measured and glued bobby pins (alternating ends for the necklaces that would need to be secured in the grasp of the bobby pin) to what would be the new bottom of the shelf, then I measured and glued hooks in to hold the bracelets.  I then spray painted the outside of the drawers and the bobby pins (lightly dusting the inside for a little shimmer) gold.  I used my sharpie paint pen to make the edges nice and pretty and precise and to make sure it matched the gold stripe in the earring frames.  

After all this, I sat back and had to think about how in the world I was going to hang up earrings from the frames.  I told you I was making this up as I went, right?  That was when I decided to add wire, hooks, and ribbons to the frames to hang them up.  I used thumbtacks to add a little more support to the fabric after using hot glue to attach the wires, hooks, and ribbons.

I haven't put it up on the wall yet, but this is what it looks like.  (When I hang it up, I will post an update.)


Goldfingers

Also, this happened during one of my brainstorms on how to get the earrings to hang up nicely.  To get this effect, draw on your nails using the sharpie paint pen and then put a top coat on.  Just a heads up, the paint does not fully dry and will discolor the brush of your topcoat.  That is all.

Oh, and this...

Also, on an unrelated note, I am in the process of trying out an oiling technique to help clear up my acne.  I have tried so many different kinds of treatment for my acne (that I have had since I was 12 years old) that I am willing to try smearing oil on my face.  Who would have thought this day would come?  Anyways, I will post again later after I have finished this little experiment.